1) On the host system, add a tap1 interface

ip tuntap add mode tap tap1
ifconfig tap1 192.168.1.1 up

2) Setup a bridge
brctl addbr br0
brctl addif br0 tap1
#let’s see the bridge:
brctl show
#also:
brctl showmacs br0

3) Setup an LXC container with the following settings in the /var/lib/lxc/my-ubuntu/config file:

lxc.network.type=veth
lxc.network.link=br0
lxc.network.flags=up
lxc.network.hwaddr = 00:22:3e:da:58:6c
lxc.utsname = my-ubuntu

ping 192.168.1.1

4) You can setup NAT now:
#!/bin/bash
echo “1” > /proc/sys/net/ipv4/ip_forward
iptables -t nat -A POSTROUTING -o wlan0 -j MASQUERADE

NOTE: Before you setup conteiner’s interfaces properly it might take too much time to start the container, If so then on the container host cd to /etc/network and change dhcp mode to manual for eth0

Troubleshooting tools:
tcpdump -i br0
tshark -i br0
ping
wget
nslookup

General info about tun/tap:

http://en.wikipedia.org/wiki/TUN/TAP

How to configure a bridge
http://www.lainoox.com/bridge-brctl-tutorial-linux/

NAT How-to:

http://www.blindhog.net/linux-bridging-for-gns3-lan-communications/

http://www.netfilter.org/documentation/HOWTO/NAT-HOWTO-6.html

LXC containers:

http://www.janoszen.com/2012/06/04/lxc-linux-containers-on-steroids/

https://www.stgraber.org/2012/05/04/lxc-in-ubuntu-12-04-lts/

http://www.linuxcertif.com/man/5/lxc.conf

In this post I’ll describe how to specify a static IP for your vpn-client connection:

1) Open from main menu VPN\OpenVPN

2) Click on Client Specific Overrides

pfSense_client_specific_overrides_tab

3) Press “+” button to add a new client-specific-override

4) Specify a) Common Name, and b) Advanced option to bind IP address

In this case vpn-client will get ip 192.168.1.7

and server will use 192.168.1.1

pfSense_client_specific_override

NOTE: Common Name should be the same as specified in the clients certificate:

If you have forgotten this name go to System\Cert Manager\Certificates and check the value of the CN for your VPN user:

pfSense_Certificate_Manager_CN

5) Go to Status\OpenVPN and kill the session for this user (ONLY if it exists):

pfSense_kill_openVPN_session

6) Now you’re done with pfSense settings, so you can reconnect your VPN-client

So run on the client host:

sudo service openvpn restart

7) check that you got the correct IP:

ifconfig

It’s a small recipe to setup openvpn access from Ubuntu via pfSense router.

———————————- pfSense Setup ———————————————

1) Setup openvpn on pfSense router according to this nice video-tutorial:

————————– Ubuntu openVPN Client Setup ——————————-

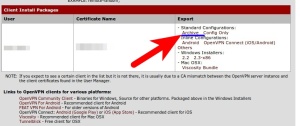
2) On the last step from the video tutorial, instead of downloading windows-exe-file, download zip Archive (see screenshot)

export_openvpn_settings_from_pfsense

3) install openvpn on you Ubuntu host:

sudo apt-get install openvpn

4) unzip downloaded on step 2) archive to /etc/openvpn

5) You should be able to see *.ovpn file rename it to my_client.conf file

6) Edit /etc/default/openvpn file

Locate #AUTOSTART=”all”

Remove “#” from this string

======================= NOTE =========================

instead of :

AUTOSTART=”all”

you can specify:

AUTOSTART=”my_client”

So only my_client.conf vpn connection will be used. Please notice: it’s simply “my_client”, and not “my_client.conf”

If you leave it as AUTOSTART=”all”, then all the *.conf connections will be started

=============== NOTE ENDS ========================

7. Start VPN connection with the following command:

sudo service openvpn start

You will be asked for username and password, use the same credentials specified on step 1)

8. It takes some time to establish connection, but aftewards, you should be able to see them with the following command:

$ ifconfig

The output should be like this:

tun0 Link encap:UNSPEC HWaddr 00-00-00-00-00-00-00-00-00-00-00-00-00-00-00-00
inet addr:192.168.1.6 P-t-P:192.168.1.5 Mask:255.255.255.255
UP POINTOPOINT RUNNING NOARP MULTICAST MTU:1500 Metric:1
RX packets:94 errors:0 dropped:0 overruns:0 frame:0
TX packets:106 errors:0 dropped:0 overruns:0 carrier:0
collisions:0 txqueuelen:100
RX bytes:14833 (14.8 KB) TX bytes:17900 (17.9 KB)

9. Try pinging a host from your VPN network

10. When you no longer need VPN connection, run this command:

sudo service openvpn stop

11. Please let me know if you think something is missing in this tutorial

12. Some additional links:

http://www.apollon-domain.co.uk/?p=433

http://habrahabr.ru/post/129510/   (Russian lang)

It was quite a pain to see this red “The site’s security certificate is not trusted!” for my site with self-signed certificate.

And took me some time to find the answer for my ubuntu 11.04 64bit chrome.

Let’s say you have a site at my_subdomain.my_domain.com

and when you go to https://my_subdomain.my_domain.com chrome shows you this red warning.

Here are the steps to fix the issue:

1)  Click on the red-crossed lock at the address bar of your browser:


red-lock

2) Go to Connection \ Certificate Information

3) Window should popup, go to Details tab, and Export certificate by saving it to a file with name my_subdomain.my_domain.com.crt

export_certificate

4) Optional step: – check the list of installed certificates by running this command from terminal:

certutil -d sql:$HOME/.pki/nssdb -L

5) Add your certificate to a list by running this command from terminal:

certutil -d sql:$HOME/.pki/nssdb -A -t “P,,” -n my_subdomain.my_domain.com -i my_subdomain.my_domain.com.crt

6) Repeat step 4) to see your certificate added

7) Restart your chrome browser and check the page.

8) Note when you open url of your site it should be the same as specified in your certificate (my_subdomain.my_domain.com should be the same on both image 1 and image 2 )

More info can be found at:

http://code.google.com/p/chromium/wiki/LinuxCertManagement